安装
离线安装
1、在该地址下载docker安装包https://download.docker.com/linux/static/stable/x86_64/。然后上传到服务器
2、解压缩后复制docker到/user/bin目录下
tar xvf docker-20.10.4.tgz
cp  docker/* /usr/bin/
3、将docker注册为service,在/etc/systemd/system目录下创建docker.service文件,并配置如下内容保存。
[Unit]
Description=Docker Application Container Engine
Documentation=https://docs.docker.com
After=network-online.target firewalld.service
Wants=network-online.target
[Service]
Type=notify
# the default is not to use systemd for cgroups because the delegate issues still

# exists and systemd currently does not support the cgroup feature set required

# for containers run by docker
ExecStart=/usr/bin/dockerd
ExecReload=/bin/kill -s HUP $MAINPID
# Having non-zero Limit*s causes performance problems due to accounting overhead

# in the kernel. We recommend using cgroups to do container-local accounting.
LimitNOFILE=infinity
LimitNPROC=infinity
LimitCORE=infinity
# Uncomment TasksMax if your systemd version supports it.
# Only systemd 226 and above support this version.
#TasksMax=infinity
TimeoutStartSec=0
# set delegate yes so that systemd does not reset the cgroups of docker containers
Delegate=yes
# kill only the docker process, not all processes in the cgroup
KillMode=process
# restart the docker process if it exits prematurely
Restart=on-failure
StartLimitBurst=3
StartLimitInterval=60s


[Install]
WantedBy=multi-user.target
然后重载unit配置文件,启动docker
systemctl daemon-reload             #重载unit配置文件
systemctl start docker                #启动Docker
systemctl enable docker.service     #设置开机自启
验证是否安装成功:
[root@uids system]# docker -v
Docker version 20.10.4, build d3cb89e
在线安装
环境& 版本
系统内核
[root@localhost data]# uname -r
3.10.0-1160.59.1.el7.x86_64
系统版本
[root@localhost data]# cat /etc/os-release
NAME="CentOS Linux"
VERSION="7 (Core)"
ID="centos"
ID_LIKE="rhel fedora"
VERSION_ID="7"
PRETTY_NAME="CentOS Linux 7 (Core)"
ANSI_COLOR="0;31"
CPE_NAME="cpe:/o:centos:centos:7"
HOME_URL="https://www.centos.org/"
BUG_REPORT_URL="https://bugs.centos.org/"

CENTOS_MANTISBT_PROJECT="CentOS-7"
CENTOS_MANTISBT_PROJECT_VERSION="7"
REDHAT_SUPPORT_PRODUCT="centos"
REDHAT_SUPPORT_PRODUCT_VERSION="7"
安装
帮助文档:
1、卸载旧版本(之前未安装请忽略)
[root@localhost data]# sudo yum remove docker \
                  docker-client \
                  docker-client-latest \
                  docker-common \
                  docker-latest \
                  docker-latest-logrotate \
                  docker-logrotate \
                  docker-engine
2、安装工具包
[root@localhost data]# yum install -y yum-utils
3、添加镜像仓库
sudo yum-config-manager \
    --add-repo \
    https://download.docker.com/linux/centos/docker-ce.repo # 该地址是官方地址,建议使用国内镜像

sudo yum-config-manager \
    --add-repo \
    http://mirrors.aliyun.com/docker-ce/linux/centos/docker-ce.repo  # 阿里云加速镜像

# 更新yum索引
[root@localhost data]# yum makecache fast
4、安装docker
# docker-ce 社区版  docker-ce-cli 客户端  容器。 默认安装最新稳定版
[root@localhost data]# sudo yum install docker-ce docker-ce-cli containerd.io
5、启动docker
[root@localhost data]# systemctl start docker
6、查看启动信息
[root@localhost data]# docker version
Client: Docker Engine - Community
 Version:           20.10.13
 API version:       1.41
 Go version:        go1.16.15
 Git commit:        a224086
 Built:             Thu Mar 10 14:09:51 2022
 OS/Arch:           linux/amd64
 Context:           default
 Experimental:      true

Server: Docker Engine - Community
 Engine:
  Version:          20.10.13
  API version:      1.41 (minimum version 1.12)
  Go version:       go1.16.15
  Git commit:       906f57f
  Built:            Thu Mar 10 14:08:16 2022
  OS/Arch:          linux/amd64
  Experimental:     false
 containerd:
  Version:          1.5.10
  GitCommit:        2a1d4dbdb2a1030dc5b01e96fb110a9d9f150ecc
 runc:
  Version:          1.0.3
  GitCommit:        v1.0.3-0-gf46b6ba
 docker-init:
  Version:          0.19.0
  GitCommit:        de40ad0
8、测试&运行 helloworld
[root@localhost data]# docker run hello-world

# 注意:如果长时间无响应需要配置国内镜像源
[root@localhost data]# vim /etc/docker/daemon.json
# 添加中科大的docker源
{
    "registry-mirrors": ["https://docker.mirrors.ustc.edu.cn"]
}
# 重启docker
[root@localhost data]# systemctl daemon-reload
[root@localhost data]# systemctl restart docker
看到下图则完成“hello-world”镜像的拉取
9、查看拉取的镜像
[root@localhost data]# docker images

10、卸载docker
# 卸载依赖
[root@localhost data] # yum remove docker-ce docker-ce-cli containerd.io
# 删除目录及资源
[root@localhost data] # rm -rf /var/lib/docker
[root@localhost data] # rm -rf /var/lib/containerd
运行原理
Docker Run 运行原理
贴张网上找的图
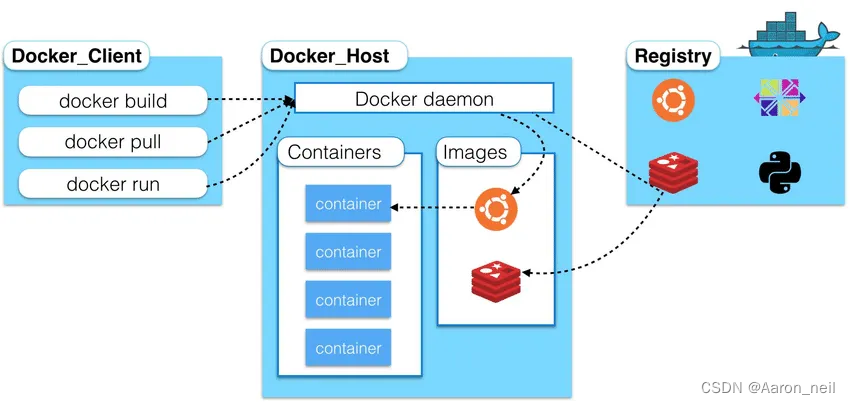
Docker 如何工作
Docker是一个客户端和服务端结构的系统,Docker的守护进程运行在主机上,通过socket连接从客户端到服务端的访问。服务端接收到客户端的请求会执行相应命令。
Docker为什么比虚拟机快
1、Docker有着比虚拟机更少的抽象层,可以实现秒级的启停。
2、Docker容器对系统资源需求很少,一台主机可以运行上千个docker容器。
3、Docker利用宿主机的操作系统内核,vm需要虚拟整个操作系统。
Docker常用同命令
帮助命令:
docker version # 显示docker版本信息
docker info # 显示docker系统信息 有镜像和容器的数量
docker {命令} --help # 帮助命令
官方命令文档:https://docs.docker.com/reference/
镜像命令:
镜像查看 docker images
[root@localhost ~]# docker images
REPOSITORY    TAG       IMAGE ID       CREATED        SIZE
hello-world   latest    feb5d9fea6a5   5 months ago   13.3kB


# 参数含义
REPOSITORY   镜像仓库源
TAG          镜像标签
IMAGE ID     镜像ID
CREATED      创建时间
SIZE         镜像大小

# 可选参数
-a, --all   #显示所有镜像
-q, --quiet #只显示镜像id
镜像搜索 docker search mysql
# 搜索相关关键字的镜像
[root@localhost ~]# docker search mysql
NAME                             DESCRIPTION                                     STARS     OFFICIAL   AUTOMATED
mysql                            MySQL is a widely used, open-source relation…   12281     [OK]
mariadb                          MariaDB Server is a high performing open sou…   4722      [OK]
mysql/mysql-server               Optimized MySQL Server Docker images. Create…   911                  [OK]
percona                          Percona Server is a fork of the MySQL relati…   572       [OK]
phpmyadmin                       phpMyAdmin - A web interface for MySQL and M…   475       [OK]
mysql/mysql-cluster              Experimental MySQL Cluster Docker images. Cr…   93
centos/mysql-57-centos7          MySQL 5.7 SQL database server                   92
bitnami/mysql                    Bitnami MySQL Docker Image                      67                   [OK]
circleci/mysql                   MySQL is a widely used, open-source relation…   25
ubuntu/mysql                     MySQL open source fast, stable, multi-thread…   25
mysql/mysql-router               MySQL Router provides transparent routing be…   23
google/mysql                     MySQL server for Google Compute Engine          20                   [OK]
vmware/harbor-db                 Mysql container for Harbor                      10
mysqlboy/docker-mydumper         docker-mydumper containerizes MySQL logical …   3
mysqlboy/mydumper                mydumper for mysql logcial backups              3
bitnami/mysqld-exporter                                                          2
ibmcom/mysql-s390x               Docker image for mysql-s390x                    1
mysqlboy/percona-server          Percona-Server a MySQL Fork with enhancement…   1                    [OK]
mirantis/mysql                                                                   0
mysql/mysql-operator             MySQL Operator for Kubernetes                   0
ibmcom/tidb-ppc64le              TiDB is a distributed NewSQL database compat…   0
mysqlboy/elasticsearch                                                           0
mysqleatmydata/mysql-eatmydata                                                   0
cimg/mysql                                                                       0
mysql/ndb-operator               MySQL NDB Operator for Kubernetes               0


# search可选帮助命令
[root@localhost ~]# docker search --help
Usage:  docker search [OPTIONS] TERM
Search the Docker Hub for images
Options:
  -f, --filter filter   Filter output based on conditions provided
      --format string   Pretty-print search using a Go template
      --limit int       Max number of search results (default 25)
      --no-trunc        Don't truncate output
--filter 通过过滤参数来搜索镜像   --filter=STARS=4000   #STARS 参数是通过search命令查询的列名搜索

[root@localhost ~]# docker search mysql --filter=STARS=4000
NAME      DESCRIPTION                                     STARS     OFFICIAL   AUTOMATED
mysql     MySQL is a widely used, open-source relation…   12281     [OK]
mariadb   MariaDB Server is a high performing open sou…   4722      [OK]
拉取下镜像 docker pull mysql
[root@localhost ~]# docker pull mysql   #默认拉取最新的镜像,如指定某个版本,添加 镜像名:[tag]  如:docker pull mysql:5.7 ,tag需要在dockerhub中存在才能拉取。
Using default tag: latest   #如果不写tag模式是latest
latest: Pulling from library/mysql
72a69066d2fe: Pull complete
93619dbc5b36: Pull complete
99da31dd6142: Pull complete
626033c43d70: Pull complete
37d5d7efb64e: Pull complete
ac563158d721: Pull complete
d2ba16033dad: Pull complete
688ba7d5c01a: Pull complete
00e060b6d11d: Pull complete
1c04857f594f: Pull complete
4d7cfa90e6ea: Pull complete
e0431212d27d: Pull complete
Digest: sha256:e9027fe4d91c0153429607251656806cc784e914937271037f7738bd5b8e7709 #签名
Status: Downloaded newer image for mysql:latest
docker.io/library/mysql:latest #真实地址


#通过指定tag拉取镜像
[root@localhost ~]# docker pull mysql:5.7
5.7: Pulling from library/mysql
72a69066d2fe: Already exists # 如果之前拉取过的镜像已经存在就不再重新拉取
93619dbc5b36: Already exists
99da31dd6142: Already exists
626033c43d70: Already exists
37d5d7efb64e: Already exists
ac563158d721: Already exists
d2ba16033dad: Already exists
0ceb82207cd7: Pull complete
37f2405cae96: Pull complete
e2482e017e53: Pull complete
70deed891d42: Pull complete
Digest: sha256:f2ad209efe9c67104167fc609cca6973c8422939491c9345270175a300419f94
Status: Downloaded newer image for mysql:5.7
docker.io/library/mysql:5.7

#查看当前的镜像
[root@localhost ~]# docker images
REPOSITORY    TAG       IMAGE ID       CREATED        SIZE
mysql         5.7       c20987f18b13   2 months ago   448MB  #指定tag的mysql 5.7
mysql         latest    3218b38490ce   2 months ago   516MB  #最新的mysql 8
hello-world   latest    feb5d9fea6a5   5 months ago   13.3kB
删除镜像 docker rmi
# 通过iamgeid强制删除
[root@localhost ~]# docker rmi -f c20987f18b13
Untagged: mysql:5.7
Untagged: mysql@sha256:f2ad209efe9c67104167fc609cca6973c8422939491c9345270175a300419f94
Deleted: sha256:c20987f18b130f9d144c9828df630417e2a9523148930dc3963e9d0dab302a76
Deleted: sha256:6567396b065ee734fb2dbb80c8923324a778426dfd01969f091f1ab2d52c7989
Deleted: sha256:0910f12649d514b471f1583a16f672ab67e3d29d9833a15dc2df50dd5536e40f
Deleted: sha256:6682af2fb40555c448b84711c7302d0f86fc716bbe9c7dc7dbd739ef9d757150
Deleted: sha256:5c062c3ac20f576d24454e74781511a5f96739f289edaadf2de934d06e910b92

#删除全部镜像,通过复合查询进行删除
[root@localhost ~]# docker rmi -f $(docker images -aq)
Untagged: mysql:latest
Untagged: mysql@sha256:e9027fe4d91c0153429607251656806cc784e914937271037f7738bd5b8e7709
Deleted: sha256:3218b38490cec8d31976a40b92e09d61377359eab878db49f025e5d464367f3b
Deleted: sha256:aa81ca46575069829fe1b3c654d9e8feb43b4373932159fe2cad1ac13524a2f5
Deleted: sha256:0558823b9fbe967ea6d7174999be3cc9250b3423036370dc1a6888168cbd224d
Deleted: sha256:a46013db1d31231a0e1bac7eeda5ad4786dea0b1773927b45f92ea352a6d7ff9
Deleted: sha256:af161a47bb22852e9e3caf39f1dcd590b64bb8fae54315f9c2e7dc35b025e4e3
Deleted: sha256:feff1495e6982a7e91edc59b96ea74fd80e03674d92c7ec8a502b417268822ff
Deleted: sha256:8805862fcb6ef9deb32d4218e9e6377f35fb351a8be7abafdf1da358b2b287ba
Deleted: sha256:872d2f24c4c64a6795e86958fde075a273c35c82815f0a5025cce41edfef50c7
Deleted: sha256:6fdb3143b79e1be7181d32748dd9d4a845056dfe16ee4c827410e0edef5ad3da
Deleted: sha256:b0527c827c82a8f8f37f706fcb86c420819bb7d707a8de7b664b9ca491c96838
Deleted: sha256:75147f61f29796d6528486d8b1f9fb5d122709ea35620f8ffcea0e0ad2ab0cd0
Deleted: sha256:2938c71ddf01643685879bf182b626f0a53b1356138ef73c40496182e84548aa
Deleted: sha256:ad6b69b549193f81b039a1d478bc896f6e460c77c1849a4374ab95f9a3d2cea2
Untagged: hello-world:latest
Untagged: hello-world@sha256:2498fce14358aa50ead0cc6c19990fc6ff866ce72aeb5546e1d59caac3d0d60f
Deleted: sha256:feb5d9fea6a5e9606aa995e879d862b825965ba48de054caab5ef356dc6b3412

#删除多个指定镜像
#docker rmi -f 镜像id 镜像id 镜像id 镜像id 镜像id
容器命令
下载一个centos最新的镜像
[root@localhost ~]# docker pull centos
Using default tag: latest
latest: Pulling from library/centos
a1d0c7532777: Pull complete
Digest: sha256:a27fd8080b517143cbbbab9dfb7c8571c40d67d534bbdee55bd6c473f432b177
Status: Downloaded newer image for centos:latest
docker.io/library/centos:latest
新建容器并启动
# docker run [可选参数]  imageid


# 可选参数
--name 容器名称 boot1 boot2 用于区分容器
-d        后台方式启动
-it        使用交互方式运行,可查看容器内容
-p        指定容器端口  -p 8080:8080
   -p     ip:主机端口:容器端口
   -p     主机端口:容器端口(推荐使用)
   -p     容器端口
-P         随机指定端口


# 启动并进入容器
[root@localhost ~]# docker run -it centos /bin/bash  #通过交互式运行,centos操作控制台为/bin/bash
[root@538f3cc84e27 /]# 主机名”root@localhost“变为Cnetos8镜像的容器ID”root@538f3cc84e27“

[root@538f3cc84e27 /]# exit 退出容器
exit
[root@localhost ~]#
查看正在运行的容器&运行过的容器
[root@localhost ~]# docker ps # 查看正在运行的容器
CONTAINER ID   IMAGE     COMMAND   CREATED   STATUS    PORTS     NAMES
[root@localhost ~]# docker ps -a # 查看运行过的容器
CONTAINER ID   IMAGE          COMMAND       CREATED         STATUS                          PORTS     NAMES
538f3cc84e27   centos         "/bin/bash"   6 minutes ago   Exited (0) About a minute ago             objective_haibt
983c6a5fde08   feb5d9fea6a5   "/hello"      4 days ago      Exited (0) 4 days ago                     elegant_poincare


# 可选参数
-a #显示当前正在运行的容器和已经运行过的容器
-n=? #显示最近创建的容器
-q  # 只显示容器编号
退出容器
exit #退出容器并停止运行
ctrl + P + Q #同时按组合键,容器不停止退出
删除容器
docker rm 容器id #删除指定容器 不能删除正在运行的容器 强制删除  rm -f
docker rm -rf $(docker ps -aq) #删除全部容器
启动和停止容器
docker start 容器id  #启动
docker stop 容器id   #停止当前正在运行的容器
docker restart 容器id #重启
docker kill 容器id    #停止当前正在运行的容器,如果stop报错直接kill进程
后台运行容器
# 通过后台启动命令启动容器后,发现并没有启动。
[root@localhost ~]# docker run -d centos
db2637cc1d69620b3713d662ca07cd45dc5a3cffd8c9b2d6204367d2c1507684
[root@localhost ~]# docker ps
CONTAINER ID   IMAGE     COMMAND   CREATED   STATUS    PORTS     NAMES

#没有启动的原因是由于docker容器使用后台运行,就必须要一个前台进程,如果没有为docker认为进程空闲,就会自动停止,例如:nginx容器启动后发现自己并没有提供服务则会立刻停止。
查看日志
docker logs
-tf  滚动显示全部日志
--tail [行数] 滚动显示最后行数的日志

[root@localhost ~]# docker logs -f -t   948f21497ed7

[root@localhost ~]# docker logs -f -t --tail 10  948f21497ed7
查看docker 容器内部的进程信息
[root@localhost ~]# docker top 容器id
UID                 PID                 PPID                C                   STIME               TTY                 TIME                CMD
root                3305                3287                0                   10:37               ?                   00:00:00            /bin/bash -c while true;do echo zwb;sleep 1; done
root                3589                3305                0                   10:41               ?                   00:00:00            /usr/bin/coreutils --coreutils-prog-shebang=sleep /usr/bin/sleep 1
查看镜像元数据
docker inspect 容器id


[root@localhost ~]# docker inspect 948f21497ed7
[
    {
        "Id": "948f21497ed72d84411069a7384eab16eb40d4886da5343511048a2c4c112c13",  #id
        "Created": "2022-03-21T02:37:13.700183781Z",
        "Path": "/bin/bash",  #bash路径
        "Args": [   #启动参数
            "-c",
            "while true;do echo zwb;sleep 1; done"
        ],
        "State": {
            "Status": "running",
            "Running": true,
            "Paused": false,
            "Restarting": false,
            "OOMKilled": false,
            "Dead": false,
            "Pid": 3305,
            "ExitCode": 0,
            "Error": "",
            "StartedAt": "2022-03-21T02:37:13.912719034Z",
            "FinishedAt": "0001-01-01T00:00:00Z"
        },
        "Image": "sha256:5d0da3dc976460b72c77d94c8a1ad043720b0416bfc16c52c45d4847e53fadb6",
        "ResolvConfPath": "/var/lib/docker/containers/948f21497ed72d84411069a7384eab16eb40d4886da5343511048a2c4c112c13/resolv.conf",
        "HostnamePath": "/var/lib/docker/containers/948f21497ed72d84411069a7384eab16eb40d4886da5343511048a2c4c112c13/hostname",
        "HostsPath": "/var/lib/docker/containers/948f21497ed72d84411069a7384eab16eb40d4886da5343511048a2c4c112c13/hosts",
        "LogPath": "/var/lib/docker/containers/948f21497ed72d84411069a7384eab16eb40d4886da5343511048a2c4c112c13/948f21497ed72d84411069a7384eab16eb40d4886da5343511048a2c4c112c13-json.log",
        "Name": "/stupefied_lamport",
        "RestartCount": 0,
        "Driver": "overlay2",
        "Platform": "linux",
        "MountLabel": "",
        "ProcessLabel": "",
        "AppArmorProfile": "",
        "ExecIDs": null,
        "HostConfig": {
            "Binds": null,
            "ContainerIDFile": "",
            "LogConfig": {
                "Type": "json-file",
                "Config": {}
            },
            "NetworkMode": "default",
            "PortBindings": {},
            "RestartPolicy": {
                "Name": "no",
                "MaximumRetryCount": 0
            },
            "AutoRemove": false,
            "VolumeDriver": "",
            "VolumesFrom": null,
            "CapAdd": null,
            "CapDrop": null,
            "CgroupnsMode": "host",
            "Dns": [],
            "DnsOptions": [],
            "DnsSearch": [],
            "ExtraHosts": null,
            "GroupAdd": null,
            "IpcMode": "private",
            "Cgroup": "",
            "Links": null,
            "OomScoreAdj": 0,
            "PidMode": "",
            "Privileged": false,
            "PublishAllPorts": false,
            "ReadonlyRootfs": false,
            "SecurityOpt": null,
            "UTSMode": "",
            "UsernsMode": "",
            "ShmSize": 67108864,
            "Runtime": "runc",
            "ConsoleSize": [
                0,
                0
            ],
            "Isolation": "",
            "CpuShares": 0,
            "Memory": 0,
            "NanoCpus": 0,
            "CgroupParent": "",
            "BlkioWeight": 0,
            "BlkioWeightDevice": [],
            "BlkioDeviceReadBps": null,
            "BlkioDeviceWriteBps": null,
            "BlkioDeviceReadIOps": null,
            "BlkioDeviceWriteIOps": null,
            "CpuPeriod": 0,
            "CpuQuota": 0,
            "CpuRealtimePeriod": 0,
            "CpuRealtimeRuntime": 0,
            "CpusetCpus": "",
            "CpusetMems": "",
            "Devices": [],
            "DeviceCgroupRules": null,
            "DeviceRequests": null,
            "KernelMemory": 0,
            "KernelMemoryTCP": 0,
            "MemoryReservation": 0,
            "MemorySwap": 0,
            "MemorySwappiness": null,
            "OomKillDisable": false,
            "PidsLimit": null,
            "Ulimits": null,
            "CpuCount": 0,
            "CpuPercent": 0,
            "IOMaximumIOps": 0,
            "IOMaximumBandwidth": 0,
            "MaskedPaths": [
                "/proc/asound",
                "/proc/acpi",
                "/proc/kcore",
                "/proc/keys",
                "/proc/latency_stats",
                "/proc/timer_list",
                "/proc/timer_stats",
                "/proc/sched_debug",
                "/proc/scsi",
                "/sys/firmware"
            ],
            "ReadonlyPaths": [
                "/proc/bus",
                "/proc/fs",
                "/proc/irq",
                "/proc/sys",
                "/proc/sysrq-trigger"
            ]
        },
        "GraphDriver": {
            "Data": {
                "LowerDir": "/var/lib/docker/overlay2/6bda94459aa59a27ab96262ba55b4e8766da10877d2166efd4dd53753e4e2175-init/diff:/var/lib/docker/overlay2/dffacbf9a6872a41057b3fbe6b7291c1ca4b76a1997f09cdf0140a197f410df8/diff",
                "MergedDir": "/var/lib/docker/overlay2/6bda94459aa59a27ab96262ba55b4e8766da10877d2166efd4dd53753e4e2175/merged",
                "UpperDir": "/var/lib/docker/overlay2/6bda94459aa59a27ab96262ba55b4e8766da10877d2166efd4dd53753e4e2175/diff",
                "WorkDir": "/var/lib/docker/overlay2/6bda94459aa59a27ab96262ba55b4e8766da10877d2166efd4dd53753e4e2175/work"
            },
            "Name": "overlay2"
        },
        "Mounts": [],
        "Config": {
            "Hostname": "948f21497ed7",
            "Domainname": "",
            "User": "",
            "AttachStdin": false,
            "AttachStdout": false,
            "AttachStderr": false,
            "Tty": false,
            "OpenStdin": false,
            "StdinOnce": false,
            "Env": [   #环境变量
                "PATH=/usr/local/sbin:/usr/local/bin:/usr/sbin:/usr/bin:/sbin:/bin"
            ],
            "Cmd": [
                "/bin/bash",
                "-c",
                "while true;do echo zwb;sleep 1; done"
            ],
            "Image": "centos",
            "Volumes": null,
            "WorkingDir": "",
            "Entrypoint": null,
            "OnBuild": null,
            "Labels": {
                "org.label-schema.build-date": "20210915",
                "org.label-schema.license": "GPLv2",
                "org.label-schema.name": "CentOS Base Image",
                "org.label-schema.schema-version": "1.0",
                "org.label-schema.vendor": "CentOS"
            }
        },
        "NetworkSettings": {
            "Bridge": "",
            "SandboxID": "50b0688d518d4c0fb0488b44323689a2b5d4dd9e9b74450826b55e8290c7b1ff",
            "HairpinMode": false,
            "LinkLocalIPv6Address": "",
            "LinkLocalIPv6PrefixLen": 0,
            "Ports": {},
            "SandboxKey": "/var/run/docker/netns/50b0688d518d",
            "SecondaryIPAddresses": null,
            "SecondaryIPv6Addresses": null,
            "EndpointID": "0cae6600a5667893224b2e188c28cf2c81b78b08a440b235446eaabe0b19aeeb",
            "Gateway": "172.17.0.1",
            "GlobalIPv6Address": "",
            "GlobalIPv6PrefixLen": 0,
            "IPAddress": "172.17.0.2",
            "IPPrefixLen": 16,
            "IPv6Gateway": "",
            "MacAddress": "02:42:ac:11:00:02",
            "Networks": {
                "bridge": {
                    "IPAMConfig": null,
                    "Links": null,
                    "Aliases": null,
                    "NetworkID": "576098a7e1ef477d32f1eb8f1dee6bf80606c6ea9fd308e7b2aea0057c210aec",
                    "EndpointID": "0cae6600a5667893224b2e188c28cf2c81b78b08a440b235446eaabe0b19aeeb",
                    "Gateway": "172.17.0.1",
                    "IPAddress": "172.17.0.2",
                    "IPPrefixLen": 16,
                    "IPv6Gateway": "",
                    "GlobalIPv6Address": "",
                    "GlobalIPv6PrefixLen": 0,
                    "MacAddress": "02:42:ac:11:00:02",
                    "DriverOpts": null
                }
            }
        }
    }
]
进入当前正在运行的容器
[root@localhost ~]# docker exec -it 容器id /bin/bash


#docker exec  #进入容器后开启一个新的终端,可以进行操作
#docker attach #进入之前正在运行容器终端,不会新建新的终端。
从容器拷贝一个文件到主机
docker cp 容器id:容器内文件路径  目标主机路径

#从容器内复制到宿主机
[root@localhost ~]# docker cp 053825fa0ed4:/home/rongqinei.java ./
Nginx安装实践
[root@localhost ~]# docker pull nginx  拉取nginx镜像
Using default tag: latest
latest: Pulling from library/nginx
a2abf6c4d29d: Pull complete
a9edb18cadd1: Pull complete
589b7251471a: Pull complete
186b1aaa4aa6: Pull complete
b4df32aa5a72: Pull complete
a0bcbecc962e: Pull complete
Digest: sha256:0d17b565c37bcbd895e9d92315a05c1c3c9a29f762b011a10c54a66cd53c9b31
Status: Downloaded newer image for nginx:latest
docker.io/library/nginx:latest
[root@localhost ~]# docker images #查看已拉取镜像
REPOSITORY   TAG       IMAGE ID       CREATED        SIZE
nginx        latest    605c77e624dd   2 months ago   141MB
centos       latest    5d0da3dc9764   6 months ago   231MB
[root@localhost ~]# docker run -d --name nginx01 -p 80:80 nginx  #启动nginx容器以后台方式启动,设置容器名称为”nginx01“ 并将本机80端口映射到容器nginx的80端口,
8d276a22cc546e532b2910c410dfb4f996df9c01632a8b4ef136261bc609afba
[root@localhost ~]# docker ps  #查看正在运行的容器
CONTAINER ID   IMAGE     COMMAND                  CREATED         STATUS         PORTS                               NAMES
8d276a22cc54   nginx     "/docker-entrypoint.…"   8 seconds ago   Up 7 seconds   0.0.0.0:80->80/tcp, :::80->80/tcp   nginx01
[root@localhost ~]# curl localhost:80 #请求已安装的nginx是否安装成功
<!DOCTYPE html>
<html>
<head>
<title>Welcome to nginx!</title>
<style>
html { color-scheme: light dark; }
body { width: 35em; margin: 0 auto;
font-family: Tahoma, Verdana, Arial, sans-serif; }
</style>
</head>
<body>
<h1>Welcome to nginx!</h1>
<p>If you see this page, the nginx web server is successfully installed and
working. Further configuration is required.</p>

<p>For online documentation and support please refer to
<a href="http://nginx.org/">nginx.org</a>.<br/>
Commercial support is available at
<a href="http://nginx.com/">nginx.com</a>.</p>

<p><em>Thank you for using nginx.</em></p>
</body>
</html>
安装ElasticSearch
# 安装es
docker run -d --name elasticsearch  -p 9200:9200 -p 9300:9300 -e "discovery.type=single-node" elasticsearch:7.6.2

#直接启动es服务器会很卡,因为es占用的内存很大,在内存小的虚拟机上启动需要进行指定最大内存。

docker run -d --name elasticsearch  -p 9200:9200 -p 9300:9300 -e "discovery.type=single-node" -e "ES_JAVA_OPTS=-Xms256m -Xmx512m" elasticsearch:7.6.2
docker可视化
通过可视化界面来管理docker里的镜像、
# 搜索 portainer
docker search portainer

#安装第一个
docker pull portainer/portainer

#单机模式运行
docker run -d -p 9000:9000 --restart=always -v /var/run/docker.sock:/var/run/docker.sock --privileged=true --name prtainer portainer/portainer
Docker镜像
什么是镜像
Docker 镜像可以看作是一个特殊的文件系统,除了提供容器运行时所需的程序、库、资源、配置等文件外,还包含了一些为运行时准备的一些配置参数(如匿名卷、环境变量、用户等)。镜像不包含任何动态数据,其内容在构建之后也不会被改变。
总的来说 “在 Dockerfile 中, 每一条指令都会创建一个镜像层,继而会增加整体镜像的大小”
commit 镜像
docker commit 提交容器成为一个新的镜像

docker commit -m="描述信息" -a="作者" 容器id 目标镜像名称:[tag]
拉取官方webapps为空的tomcat,然后将内容tomcat默认页面复制到容器内的webapps下,将添加完tomcat网页的容器提交。
#拉取镜像
[root@localhost ~]# docker pull tomcat
Using default tag: latest
latest: Pulling from library/tomcat
0e29546d541c: Pull complete
9b829c73b52b: Pull complete
cb5b7ae36172: Pull complete
6494e4811622: Pull complete
668f6fcc5fa5: Pull complete
dc120c3e0290: Pull complete
8f7c0eebb7b1: Pull complete
77b694f83996: Pull complete
0f611256ec3a: Pull complete
4f25def12f23: Pull complete
Digest: sha256:9dee185c3b161cdfede1f5e35e8b56ebc9de88ed3a79526939701f3537a52324
Status: Downloaded newer image for tomcat:latest
docker.io/library/tomcat:latest
# 启动镜像
[root@localhost ~]# docker run  -it -p 8080:8080 --name tomcat01 tomcat
默认镜像拉取运行后的tomcat由于webapps下无内容访问为404。
复制webapps.dist文件夹下的内容到webapps下。
root@47be79cf448d:/usr/local/tomcat/webapps# cp -r ../webapps.dist/* ./
root@47be79cf448d:/usr/local/tomcat/webapps# ls
ROOT  docs  examples  host-manager  manager
然后将添加完网页内容的tomcat容器提交为一个新的镜像,可以将当前容器的镜像添加为一个“快照”。
[root@localhost ~]# docker commit -m="add webapps webpage" -a="ZaNgVVB" 47be79cf448d  tomcat-addpage:1.0
sha256:10c17d0b6f9af163325c386558ac14cf6b9a7e8f6cf35817fac0869327d29183
[root@localhost ~]# docker images
REPOSITORY            TAG       IMAGE ID       CREATED         SIZE
tomcat-addpage        1.0       10c17d0b6f9a   9 seconds ago   684MB # 该镜像为刚才提交的新镜像
mysql                 8.0.28    562c9bc24a08   3 days ago      521MB
nginx                 latest    605c77e624dd   2 months ago    141MB
tomcat                latest    fb5657adc892   2 months ago    680MB # 该镜像是从官方拉取的镜像
centos                latest    5d0da3dc9764   6 months ago    231MB
portainer/portainer   latest    580c0e4e98b0   12 months ago   79.1MB
elasticsearch         7.6.2     f29a1ee41030   24 months ago   791MB
Docker镜像具有分层、按内容寻址、共享镜像层等特点,一个镜像可分为多个镜像层,也是因为docker镜像分层的特点,可以做到按需下载,节约资源,提升效率
容器数据卷
什么是容器数据卷
docker的理念是将应用和运行环境打包为一个镜像,应用是会产生数据的,如果数据都在容器中那么容器删除后数据会将丢失。所以数据需要持久化。将容器中的应用产生的数据存储到本地。也就是将容器内的数据目录挂载到主机目录上。
方式一:使用命令直接挂载
docker run -it -v 主机目录:容器目录

#通过命令行的方式挂载目录
[root@localhost ~]# docker run -it -v /home/test:/home centos /bin/bash
挂载完毕后在主机目录下会有个“test”目录。
[root@localhost test]# pwd
/home/test

# 通过inspect 查看容器信息
[root@localhost test]# docker inspect cac72504cbff

"Mounts": [
            {
                "Type": "bind",         # 挂载类型,可以是bind、volume、tmpfs
                "Source": "/home/test", # 宿主机目录
                "Destination": "/home", # 容器目录
                "Mode": "",
                "RW": true,
                "Propagation": "rprivate"
            }
        ],
在容器内添加一个文件,则会同步到相应的主机目录下。
容器目录:
主机目录:
然后将容器停止,修改宿主机中的“inner.java”文件,再启动容器,看看是否会将内容同步过去
启动容器后发现文件内容已经更新了。
有了数据卷,以后修改容器内的各种配置文件、数据都可以直接在宿主机上进行操作,不用再进入容器中。
Mysql安装实践
# 1、拉取镜像
docker pull mysql
# 2、运行Mysql
[root@localhost ~]# docker run -d -p 3306:3306 -v /home/mysql/conf:/etc/mysql/conf.d -v /home/mysql/data:/var/lib/mysql -e MYSQL_ROOT_PASSWORD=Zz660208 --name mysqlserver mysql:8.0.28
Mysql已启动,通过Navicat连接试试。
如果容器删除后,数据卷依然还在,到此就完成了数据卷的挂载。
具名挂载和匿名挂载
# 匿名挂载
[root@localhost /]# docker run -d -P --name nginx01 -v /etc/nginx nginx
71acc09e71cfae390cc82691c23245658892e25696337c3b606a86699aeba420
# 查看所有卷的情况
[root@localhost /]# docker volume ls
DRIVER    VOLUME NAME
local     7de1f4f3d096e82f021851cbf1255a457db5e4009a4614f2aa94ae7e01b0590d
local     15262b1d04e8c6c2fb818234e11bb3faac6d59279420dacb3f58fe9f08885142
local     bff4948803733017e0ba9341873c879bb6edea6c917a6b19fa27fb8b0312fd4e
local     c229754dfb32392522d6d35f5bec0df01369793b69f6792cce5d23ed42c94d91
local     c464984b7e967140bc50aa0ce45a2919477691be5f8fa072f20a576a43749b9c
# 如果启动时只写容器内的路径不写宿主机的路径就是匿名挂载

# 具名挂载
# 通过 -v "卷名":"容器内路径"
[root@localhost /]# docker run -d -P --name nginx02 -v juming-nginx:/etc/nginx nginx
fc35b6b435c09346053072c07d8c55a45ee5e6c4b1535da6299e8848c276a396
[root@localhost /]# docker volume ls
DRIVER    VOLUME NAME
local     7de1f4f3d096e82f021851cbf1255a457db5e4009a4614f2aa94ae7e01b0590d
local     15262b1d04e8c6c2fb818234e11bb3faac6d59279420dacb3f58fe9f08885142
local     bff4948803733017e0ba9341873c879bb6edea6c917a6b19fa27fb8b0312fd4e
local     c229754dfb32392522d6d35f5bec0df01369793b69f6792cce5d23ed42c94d91
local     c464984b7e967140bc50aa0ce45a2919477691be5f8fa072f20a576a43749b9c
local     juming-nginx  #挂载名

# 查看具名挂载的目录
[root@localhost /]# docker volume inspect juming-nginx
[
    {
        "CreatedAt": "2022-03-23T09:59:19+08:00",
        "Driver": "local",
        "Labels": null,
        "Mountpoint": "/var/lib/docker/volumes/juming-nginx/_data",
        "Name": "juming-nginx",
        "Options": null,
        "Scope": "local"
    }
]
所有docker容器内的卷在没有指定目录的情况下都在 /var/lib/docker/volumes/卷名/_data
# 何确定是居民挂载还是匿名挂载或指定路径挂载
-v 容器内路径 #匿名
-v 卷名:容器内路径 #具名
-v /宿主机路径:容器内路径 #指定路径
指定目录读写权限
通过-v 容器内路径:ro rw改变读写权限
ro read only 只读
rw readwrite 读写
# 如果设置了容器权限,容器对挂载出来的内容就有限制。
docker run -d -P --name nginx02 -v juming-nginx:/etc/nginx:ro nginx
docker run -d -P --name nginx02 -v juming-nginx:/etc/nginx:rw nginx
如果加了ro参数说明操作只能在宿主机完成,容器没有权限。
方式二:通过创建dockerfile在构建镜像时挂载数据卷
编写dockerFile
FORM centos

VOLUME ["volume01","volume02"]

CMD echo "----end----"
CMD /bin/bash
测试构建镜像
# 参数解释
-f # DockerFile 路径
-t # 要构建的Docker镜像名称
[root@localhost docker-test-volume]# docker build -f dockerfile -t zwbcentos .
Sending build context to Docker daemon  2.048kB
Step 1/4 : FROM centos
 ---> 5d0da3dc9764
Step 2/4 : VOLUME ["volume01","volume02"]
 ---> Running in 131bd97d79e6
Removing intermediate container 131bd97d79e6
 ---> 6b2be2fc3567
Step 3/4 : CMD echo "----end----"
 ---> Running in 51e4c1b66ed0
Removing intermediate container 51e4c1b66ed0
 ---> 6f3a459eef90
Step 4/4 : CMD /bin/bash
 ---> Running in e944b791e156
Removing intermediate container e944b791e156
 ---> 7f95c719e174
Successfully built 7f95c719e174
Successfully tagged zwbcentos:latest
宿主机挂载点通过查看容器信息可以看到
在自己构建镜像时这种方式挂载卷是使用最多的,如果构建镜像时没有挂载,那么就需要 -v 参数手动挂载。
数据卷容器
启动三个Docker容器,实现容器内的数据同步
启动第二个容器,挂载到docker01的数据卷上。
# 将docker01的数据卷挂载到docker02上
[root@localhost docker-test-volume]# docker run -it --name docker02 --volumes-from docker01  zwbcentos
在docker01的volume1目录下创建一个create-docker01-volume01.java,查看数据是否同步。
连接docker02进入volume1目录,文件已同步。
再创建一个docker03容器,进入volume01目录,数据也已经同步
如果将其中的一个容器删除,那么数据也还是存在的,因为数据同步以宿主机为准,如果将宿主机的挂载目录下的文件删除,容器中的文件也会同步删除
DockerFile
什么是DockerFile
DockerFile是用来构建镜像的文件,具有命令、参数、脚本。
构建步骤:
1、编写一个dockerfile
2、docker build 构建成一个镜像
3、docker run 运行镜像
4、docker push 发布镜像 (DockerHub、阿里云镜像仓库)
DockerFile构建
DockerFile基础
1、DockerFile的关键字都是大写
2、从上往下顺序执行
3、# 标识注释
4、每一个指令都会创建一个新的镜像层,并提交。
DockerFile指令
FROM          # 基础镜像,从这开始构建
MAINTAINER     # 镜像编写人,姓名+邮箱
RUN         # 构建镜像需要的命令
ADD         # 步骤 添加的内容
WORKDIR     # 工作目录
VOLUME         # 挂载目录
EXPOSE         # 对外暴露的端口
CMD         # 指定容器启动时运行的命令,只有最后一个会生效,命令会被替换。
ENTRYPOINT     # 指定容器启动时运行的命令,可以追加命令。
ONBUILD     # 当构建一个被集成的DockerFile时会运行ONBUILD的指令
COPY        # 类似ADD,将文件复制到镜像中
ENV            # 构建时设置的环境变量
附带一张晚上找的图
构建自己的镜像
1、编写DockerFile
[root@localhost dockerfile]# vim mydockerfile

FROM centos
MAINTAINER ZaNgVVB<[email protected]>

ENV MYPATH /usr/local
WORKDIR $MYPATH

RUN yum -y install vim
RUN yum -y install net-tools

EXPOSE 80


CMD echo $MYPATH
CMD echo "build end"
CMD /bin/bash
2、构建dockerfile
[root@localhost dockerfile]# docker build -f mydockerfile -t mycentos .
3、运行已构建的镜像
[root@localhost dockerfile]# docker run -it --name mybuildcentos mycentos
[root@47767221f901 local]# pwd
/usr/local
[root@47767221f901 local]#
[root@47767221f901 local]#
[root@47767221f901 local]#
[root@47767221f901 local]#
[root@47767221f901 local]#
[root@47767221f901 local]#
[root@47767221f901 local]# vim 1  # vim 工具已安装
[root@47767221f901 local]# ifconfig # ifconfig 命令可正常使用
eth0: flags=4163<UP,BROADCAST,RUNNING,MULTICAST>  mtu 1500
        inet 172.17.0.3  netmask 255.255.0.0  broadcast 172.17.255.255
        ether 02:42:ac:11:00:03  txqueuelen 0  (Ethernet)
        RX packets 8  bytes 656 (656.0 B)
        RX errors 0  dropped 0  overruns 0  frame 0
        TX packets 0  bytes 0 (0.0 B)
        TX errors 0  dropped 0 overruns 0  carrier 0  collisions 0

lo: flags=73<UP,LOOPBACK,RUNNING>  mtu 65536
        inet 127.0.0.1  netmask 255.0.0.0
        loop  txqueuelen 1000  (Local Loopback)
        RX packets 0  bytes 0 (0.0 B)
        RX errors 0  dropped 0  overruns 0  frame 0
        TX packets 0  bytes 0 (0.0 B)
        TX errors 0  dropped 0 overruns 0  carrier 0  collisions 0
构建Tomcat镜像
1、准备tomcat和jdk的压缩包
2、编写Dockerfile
文件命名规则首字母大小Dockerfile,该命名是官方推荐的,在构建镜像是默认会从当前目录下寻找名为Dockerfile的文件。
FROM centos:7.9.2009
MAINTAINER ZaNgVVB<[email protected]>

COPY readme.txt /usr/local/readme.txt


ADD jdk-8u161-linux-x64.tar.gz /usr/local
ADD apache-tomcat-8.0.50.tar.gz /usr/local

RUN yum -y install vim

ENV BASEPATH /usr/local

WORK $BASEPATH

ENV JAVA_HOME $BASEPATH/jdk1.8.0_161
ENV CLASSPATH $JAVA_HOME/lib/dt.jar:$JAVA_HOME/lib/tools.jar
ENV CATALINA_HOME $BASEPATH/apache-tomcat-8.0.50
ENV CATALINA_BASH $BASEPATH/apache-tomcat-8.0.50
ENV PATH $PATH:$JAVA_HOME/bin:$CATALINA_HOME/lib:$CATALINA_HOME/bin


EXPOSE 8899


CMD $CATALINA_HOME/bin/startup.sh && tailf $CATALINA_HOME/logs/catalina.out
3、构建
[root@localhost tomcat]#docker build -t mydiytomcat .

# 查看已构建的镜像
[root@localhost tomcat]# docker images
REPOSITORY            TAG        IMAGE ID       CREATED          SIZE
mydiytomcat           latest     86af25692aed   10 seconds ago   818MB  #已经构建好的镜像
mycentos              latest     e86a16fbd0ab   16 hours ago     580MB
tomcat-addpage        1.0        10c17d0b6f9a   47 hours ago     684MB
mysql                 8.0.28     562c9bc24a08   5 days ago       521MB
nginx                 latest     605c77e624dd   2 months ago     141MB
tomcat                latest     fb5657adc892   3 months ago     680MB
centos                7.9.2009   eeb6ee3f44bd   6 months ago     204MB
portainer/portainer   latest     580c0e4e98b0   12 months ago    79.1MB
elasticsearch         7.6.2      f29a1ee41030   24 months ago    791MB
启动刚才构建的镜像并将tomcat的webapps目录和logs目录挂载到/home/tomcat/下
4、运行
#启动容器,并开放tomcat端口到挂载logs目录、webapps目录,这边忘了挂载conf目录,最好将conf目录也一同样的方式挂载出来,不然改了配置文件删除容器后之前修改的文件都没了。
[root@localhost webapps]# docker run -d -p 8899:8899 --name diytomcat -v /home/tomcat/webapps/:/usr/local/apache-tomcat-8.0.50/webapps -v /home/tomcat/logs/:/usr/local/apache-tomcat-8.0.50/logs/ mydiytomcat
启动后访问ip +端口就能看到tomcat的页面
发布自己的镜像
1、在dockerhub注册账号
2、在服务器上提交镜像
# 登录账号
[root@localhost home]# docker login -u zangvvb
Password:
WARNING! Your password will be stored unencrypted in /root/.docker/config.json.
Configure a credential helper to remove this warning. See
https://docs.docker.com/engine/reference/commandline/login/#credentials-store

Login Succeeded

#推送镜像
The push refers to repository [docker.io/library/mydiytomcat]
7c82e38efbac: Preparing
4d806e21f41e: Preparing
286b9c04cb9d: Preparing
d483ffa2ef11: Preparing
174f56854903: Preparing
denied: requested access to the resource is denied  #如果推送是有这个问题就是镜像名中没有用户名造成的,重建一个带有用户名的镜像,

REPOSITORY            TAG        IMAGE ID       CREATED          SIZE
zangvvb/mydiytomcat   1.0        86af25692aed   53 minutes ago   818MB  #this one
mydiytomcat           1.0        86af25692aed   53 minutes ago   818MB
mydiytomcat           latest     86af25692aed   53 minutes ago   818MB

#推送是镜像名称中必须要有用户名+镜像名组成的镜像吗,如果没有使用tag命令重新创建一个镜像
docker tag [镜像名] [用户名]/新镜像名:tag

eg: docker tag mydiytomcat zangvvb/mydiytomcat:1.0
#重新推送
[root@localhost home]# docker push ZaNgVVB  mydiytomcat:1.0
The push refers to repository [docker.io/zangvvb/mydiytomcat]
7c82e38efbac: Pushed
4d806e21f41e: Pushed
286b9c04cb9d: Pushed
d483ffa2ef11: Pushed
174f56854903: Pushed
1.0: digest: sha256:fe993c2e53928d365c31ba2530521398f519a0ed69d1d0bf84f60f3f71da6153 size: 1372
Docker网络
理解Docker网络
查看本机网络
发现有三个网络
Docker是怎么处理容器网络的?
Docker每启动一个docker容器,docker会给容器分配一个ip,只有安装docker就会有一个名为docker0的网卡使用桥接模式。所使用的技术则是evth-pair技术。

给容器创建的网卡都是成对出现,一端连着协议,一端彼此相连。有了这个特性evth-pair充当桥梁连接各种虚拟网络设备。

容器和容器间也可以互相ping通。
自定义网络
查看所有的docker网络
网络模式
bridge:桥接
none : 不适用网络
host:和宿主机共享网络
container: 容器网络联通(不常使用)
测试
#创建一个自定义网络


# --driver bridge
# --subnet 10.1.0.0/16  10.1.255.255
# --gateway 10.1.0.1

[root@localhost home]# docker network create --driver bridge --subnet 10.1.0.0/16 --gateway 10.1.0.1 mynet
28706e89c6801e141d68c1e70c9ef866eb2400bf442ea66280dcaa340d894653
#查看网络
[root@localhost home]# docker network ls
NETWORK ID     NAME      DRIVER    SCOPE
0332467f449e   bridge    bridge    local
6b8e9de072e9   host      host      local
28706e89c680   mynet     bridge    local  #this one
03269f357ff0   none      null      local


#启动容器并指定网络
[root@localhost home]# docker run -it --name centos03 --net mynet centos /bin/bash
[root@localhost home]# docker run -it --name centos04 --net mynet centos /bin/bash


[root@localhost home]# docker inspect mynet
[
    {
        "Name": "mynet",
        "Id": "28706e89c6801e141d68c1e70c9ef866eb2400bf442ea66280dcaa340d894653",
        "Created": "2022-03-24T16:06:48.557531649+08:00",
        "Scope": "local",
        "Driver": "bridge",
        "EnableIPv6": false,
        "IPAM": {
            "Driver": "default",
            "Options": {},
            "Config": [
                {
                    "Subnet": "10.1.0.0/16",
                    "Gateway": "10.1.0.1"
                }
            ]
        },
        "Internal": false,
        "Attachable": false,
        "Ingress": false,
        "ConfigFrom": {
            "Network": ""
        },
        "ConfigOnly": false,
        "Containers": {
            "6f2c752411955543e1deda47c36be2b540909acea55ae4a1e332db4a536b0696": {   #对应的容器
                "Name": "centos04",
                "EndpointID": "97bf26ad95b231e0e3cf2ce82097a4e943619c7ee10c39bbd9a54c80ead3df15",
                "MacAddress": "02:42:0a:01:00:03",
                "IPv4Address": "10.1.0.3/16",
                "IPv6Address": ""
            },
            "70d4ce5140b00dc461914eebdd4cc1836e23e85bc72c6ecaa1771458ed85cc0d": { #对应的容器
                "Name": "centos03",
                "EndpointID": "ad7050e7c29a4e7754e93a5958a029148e3aeb8ec2d8b91f32441eded6fdfa0a",
                "MacAddress": "02:42:0a:01:00:02",
                "IPv4Address": "10.1.0.2/16",
                "IPv6Address": ""
            }
        },
        "Options": {},
        "Labels": {}
    }
]
然后进入容器互相ping cnetos03和cnetos04
如下图:在centos03中ping centos04网络是通的。
然后进入centos04中ping centos03,网络也是通的,所对应的主机名和ip也都是对应的。
结论
在自定义的网络docker以及维护好了对应关系,在微服务或者其他中间件部署安装时,不用再手动维护主机名和ip地址的关系,更加方便。在平时使用过程中推荐这样使用。
网络连通
如果两个容器跨网段要进行网络互通该怎么做呢?这就用到了network中的connect指令
先查看docker0网卡下的节点ip
再查看在mynet网卡下centos03的ip,然后将centos-docker0容器加入到mynet网卡中。
# 通过connect命令将centos-docker0加入到mynet
[root@localhost ~]# docker network connect mynet centos-docker0
然后查看centos-docker0的网络情况,发现这个容器有两个ip地址
然后进入docker0容器ping mynet 下的 centos02 和centos03,网络都是通的说明网络连通没有问题。
Redis集群实战
1、创建redis网卡
docker network create redis -subnet 10.18.32.0/16
2、通过脚本创建redis的配置文件&启动redis
for port in $(seq 1 6); \
do \
mkdir -p /data/redis-cluster/node${port}/conf
touch /data/redis-cluster/node${port}/conf/redis.conf
cat <<EOF >/data/redis-cluster/node${port}/conf/redis.conf
port 6379
bind 0.0.0.0
cluster-enabled yes
cluster-config-file nodes.conf
cluster-node-timeout 5000
cluster-announce-ip 10.18.32.1${port}
cluster-announce-port 6379
cluster-announce-bus-port 16379
appendonly yes
loglevel notice
logfile "/data/redis-cluster/node${port}/logs/redis.log"
EOF

#启动脚本
docker run -p 637${port}:6379 -p 1637${port}:16379 --name redis-server${port} \
-v /data/redis-cluster/node${port}/data:/data \
-v /data/redis-cluster/node${port}/conf/redis.conf:/etc/redis/redis.conf \
-d --net redis --ip 10.18.32.1${port} redis:5.0.14 redis-server /etc/redis/redis.conf
done
3、进入一个容器并创建集群
[root@localhost data]# docker exec -it redis-server1 /bin/bash

#创建集群
redis-cli --cluster create 10.18.32.11:6379 10.18.32.12:6379 10.18.32.13:6379 10.18.32.14:6379 10.18.32.15:6379 10.18.32.16:6379 --cluster-replicas 1

>>> Performing hash slots allocation on 6 nodes...
Master[0] -> Slots 0 - 5460
Master[1] -> Slots 5461 - 10922
Master[2] -> Slots 10923 - 16383
Adding replica 10.18.32.15:6379 to 10.18.32.11:6379
Adding replica 10.18.32.16:6379 to 10.18.32.12:6379
Adding replica 10.18.32.14:6379 to 10.18.32.13:6379
M: b181f8dbd376a73c86050368914b4627ecb96cce 10.18.32.11:6379
   slots:[0-5460] (5461 slots) master
M: 27c42b3e11594e8bc60aea521c799da054d7f9ea 10.18.32.12:6379
   slots:[5461-10922] (5462 slots) master
M: ee6edf7835fd22928fd392847c368854edb5ad21 10.18.32.13:6379
   slots:[10923-16383] (5461 slots) master
S: 34f011cfaf7ab601ddc401aea0855e6871113240 10.18.32.14:6379
   replicates ee6edf7835fd22928fd392847c368854edb5ad21
S: c479412c2e3ac38d8ba28538d45468986bb46b33 10.18.32.15:6379
   replicates b181f8dbd376a73c86050368914b4627ecb96cce
S: 7540e6f9217b7eb3f6f11ec471a1c7d31e04f4a9 10.18.32.16:6379
   replicates 27c42b3e11594e8bc60aea521c799da054d7f9ea
Can I set the above configuration? (type 'yes' to accept): yes
>>> Nodes configuration updated
>>> Assign a different config epoch to each node
>>> Sending CLUSTER MEET messages to join the cluster
Waiting for the cluster to join
..
>>> Performing Cluster Check (using node 10.18.32.11:6379)
M: b181f8dbd376a73c86050368914b4627ecb96cce 10.18.32.11:6379
   slots:[0-5460] (5461 slots) master
   1 additional replica(s)
M: ee6edf7835fd22928fd392847c368854edb5ad21 10.18.32.13:6379
   slots:[10923-16383] (5461 slots) master
   1 additional replica(s)
S: c479412c2e3ac38d8ba28538d45468986bb46b33 10.18.32.15:6379
   slots: (0 slots) slave
   replicates b181f8dbd376a73c86050368914b4627ecb96cce
M: 27c42b3e11594e8bc60aea521c799da054d7f9ea 10.18.32.12:6379
   slots:[5461-10922] (5462 slots) master
   1 additional replica(s)
S: 34f011cfaf7ab601ddc401aea0855e6871113240 10.18.32.14:6379
   slots: (0 slots) slave
   replicates ee6edf7835fd22928fd392847c368854edb5ad21
S: 7540e6f9217b7eb3f6f11ec471a1c7d31e04f4a9 10.18.32.16:6379
   slots: (0 slots) slave
   replicates 27c42b3e11594e8bc60aea521c799da054d7f9ea
[OK] All nodes agree about slots configuration.
>>> Check for open slots...
>>> Check slots coverage...
[OK] All 16384 slots covered.
Redis集群创建成功!!!
SpringBoot项目打包Docker镜像
1、构建Springboot项目&编写测试接口
package com.zwb.springbootdocker;

import org.springframework.web.bind.annotation.GetMapping;
import org.springframework.web.bind.annotation.RestController;

/**
 * @Company: zdww</ p>
 * @Project: springboot-docker</p>
 * @ClassName: Controller</ p>
 * @Description: TODO </p>
 * @CreateDate: 2022/3/25  10:42</p>
 * @Author: ZaNgVVB:)</p>
 * @Version: 1.0.0</ p>
 * @Copyright: Copyright(c) 2022</p>
 */
@RestController

public class Controller {


    @GetMapping("hello")
    public String  hello(){
        return  "hello,Test Docker";
    }
}
2、打包应用
mvn clean package -Dmaven.test.skip=true
3、编写Dockerfile
FROM java:8

COPY *.jar /app.jar
CMD ["----server port=8080"]
EXPOSE 8080

ENTRYPOINT ["java","-jar","/app.jar"]
编写完dockerfile后将Dockerfile和jar包上传到服务器某个目录下开始构建镜像
4、构建镜像
[root@localhost idea]# docker build -t springboot-docker .
Sending build context to Docker daemon  17.42MB
Step 1/5 : FROM java:8
8: Pulling from library/java
5040bd298390: Pull complete
fce5728aad85: Pull complete
76610ec20bf5: Pull complete
60170fec2151: Pull complete
e98f73de8f0d: Pull complete
11f7af24ed9c: Pull complete
49e2d6393f32: Pull complete
bb9cdec9c7f3: Pull complete
Digest: sha256:c1ff613e8ba25833d2e1940da0940c3824f03f802c449f3d1815a66b7f8c0e9d
Status: Downloaded newer image for java:8
 ---> d23bdf5b1b1b
Step 2/5 : COPY *.jar /app.jar
 ---> 1635be3cd9fa
Step 3/5 : CMD ["----server port=8080"]
 ---> Running in b8e6c0af98d7
Removing intermediate container b8e6c0af98d7
 ---> c7ff81878bec
Step 4/5 : EXPOSE 8080
 ---> Running in 05c1e25b0382
Removing intermediate container 05c1e25b0382
 ---> 57b6efcb2a7c
Step 5/5 : ENTRYPOINT ["java","-jar","/app.jar"]
 ---> Running in 8b2b82acdaba
Removing intermediate container 8b2b82acdaba
 ---> 7f9beda7d9a8
Successfully built 7f9beda7d9a8
Successfully tagged springboot-docker:latest
5、发布运行
[root@localhost idea]# docker run -d -P --name springboot-doker springboot-docker
DockerCompose
什么是DockerCompose
Compose 是Docker官方开源的项目,负责实现对Docker容器的集群的快速编排,跟openstack中的Heat十分类似,Compose定位是定义和运行多个Docker容器的应用将相关连的容器整合到一起,对一组容器进行按照指定顺序启动,其前身是开源项目Fig
怎么使用DockerCompose
- 使用 Dockerfile 定义应用程序的环境。
- 使用 docker-compose.yml 定义构成应用程序的服务,这样它们可以在隔离环境中一起运行。
- 最后,执行
docker-compose up命令来启动并运行整个应用程序。
docker-compose安装
sudo curl -L https://github.com/docker/compose/releases/download/2.4.0/docker-compose-`uname -s`-`uname -m` -o /usr/local/bin/docker-compose
chmod +x /usr/local/bin/docker-compose